

I spent three weeks staring at Google Search Console wondering why every single post on my Blogger site showed a red "Redirect Error" badge. I hadn't changed anything. The URLs worked fine in my browser. But Google's crawler was stuck in a loop, and my traffic had flatlined.
If you run a Blogger site, you probably know the exact screenshot I'm talking about. You open GSC, check your indexing status, and see a massive list of urls with redirect error. Your clean URLs aren't getting indexed, your search traffic is stalling, and the standard SEO advice you find on forums isn't working because this isn't a normal SEO problem. It's an architecture problem baked into Blogger's mobile detection.
The culprit? Blogger's ancient, hardcoded ?m=1 mobile redirect. In this guide, I'm going to break down exactly why this error happens in the era of Mobile-First Indexing, why the usual fixes fail, and how I finally solved it using a custom Cloudflare Worker Edge Proxy — without sacrificing site speed or mobile usability.
How I Discovered This Wasn't a Normal SEO Problem
Like most people, I assumed I had done something wrong at first. I checked my robots.txt, looked for broken canonical tags, and even reverted my template to a default Blogger theme to rule out custom code. Nothing changed. The redirect errors kept piling up.
Then I started looking at the crawl logs more carefully. Googlebot Smartphone was requesting my clean URLs — yoursite.com/post.html — and Blogger's server was immediately responding with a 302 Redirect to the mobile version. That would be fine if Google treated it as a simple alternate page. But here's the trap: when Googlebot lands on the ?m=1 URL, it reads the canonical tag, which points right back to the clean URL. So Googlebot tries the clean URL again, gets redirected again, and eventually gives up. The result is a Redirect Error in Search Console and a URL that never gets indexed.
This loop is especially nasty because it only affects crawlers. Real users on phones never notice it — they get redirected, see the content, and move on. That's why this issue hides in plain sight until you actively check your indexing status.
Why the Blogger "?m=1" Redirect Error Happens
Google now operates almost entirely on Mobile-First Indexing. This means the primary crawler analyzing your website is Googlebot Smartphone. Here is exactly what happens when it crawls a standard Blogger site:
- Googlebot Smartphone requests your clean URL (e.g.,
yoursite.com/post.html). - Blogger's backend detects the smartphone User-Agent and forcefully issues a 302 Redirect to
yoursite.com/post.html?m=1. - Googlebot lands on the
?m=1page and reads your canonical tag, which says the clean URL is the official page. - Googlebot gets trapped in a logic loop: "The canonical says the clean URL is the master, but the server won't let me reach it without redirecting me." The result? Google abandons the crawl and slaps your URL with a fatal Redirect Error.
The Fixes I Tried That Didn't Work
Before landing on the Cloudflare Worker approach, I wasted time on several dead ends that sound logical but fail in practice. I'm sharing them so you don't repeat my mistakes:
Blocking ?m=1 in robots.txt: This feels like the obvious move. Just tell Google not to crawl the mobile parameter, right? The problem is that Googlebot still hits the redirect itself. Robots.txt doesn't stop a 302 redirect from happening — it only stops crawling of the destination. So you still end up with uncleaned URLs and crawl budget wasted on redirects.
Changing canonical tags: I tried making the ?m=1 version canonical instead. That technically removes the redirect error, but then you end up with ugly parameterized URLs ranking in Google. It also splits your social signals and backlinks across two versions of the same page. Not worth it.
User-Agent spoofing via meta tags: Some guides suggest adding device-specific meta tags to trick Blogger into thinking every visitor is desktop. This is fragile — Blogger updates their detection logic periodically, and it can break your mobile layout for real users.
The Solution: An Edge Reverse Proxy
The real fix happens before the request ever reaches Blogger. By deploying a specifically engineered Cloudflare Worker, we can intercept Googlebot before it triggers Blogger's redirect logic. Instead of letting the bot hit Blogger directly, the Worker secretly fetches the mobile HTML on the backend, scrubs the code clean of any ?m=1 traces, and hands it back to Googlebot as a flawless, redirect-free 200 OK on the clean URL.
Real users still get the same experience — mobile visitors receive the mobile-rendered HTML, desktop visitors get the desktop version. The only difference is that bots no longer see redirects, and all internal links inside the HTML point to clean URLs.
The real solution is Edge Computing.
Because the Worker sits between your domain and Blogger's origin, it has full control over what each visitor receives. It adds no perceptible latency — we're talking about edge servers located geographically close to the user, processing simple text replacements in milliseconds.
What This Setup Actually Gives You
HTMLRewriter API to surgically scrub the HTML stream in real-time, ripping ?m=1 out of every link before the bot sees it.?m=1 URLs are floating around in bookmarks or old backlinks, this Worker intercepts them and throws a strict 301 Permanent Redirect back to the clean URL.How to Deploy the Worker on Cloudflare (Step-by-Step)
Deploying this script takes less than ten minutes and works perfectly on Cloudflare's Free tier. I run this exact setup on multiple Blogger sites without paying Cloudflare a cent. Here is the exact process:
Phase 1: Create the Worker
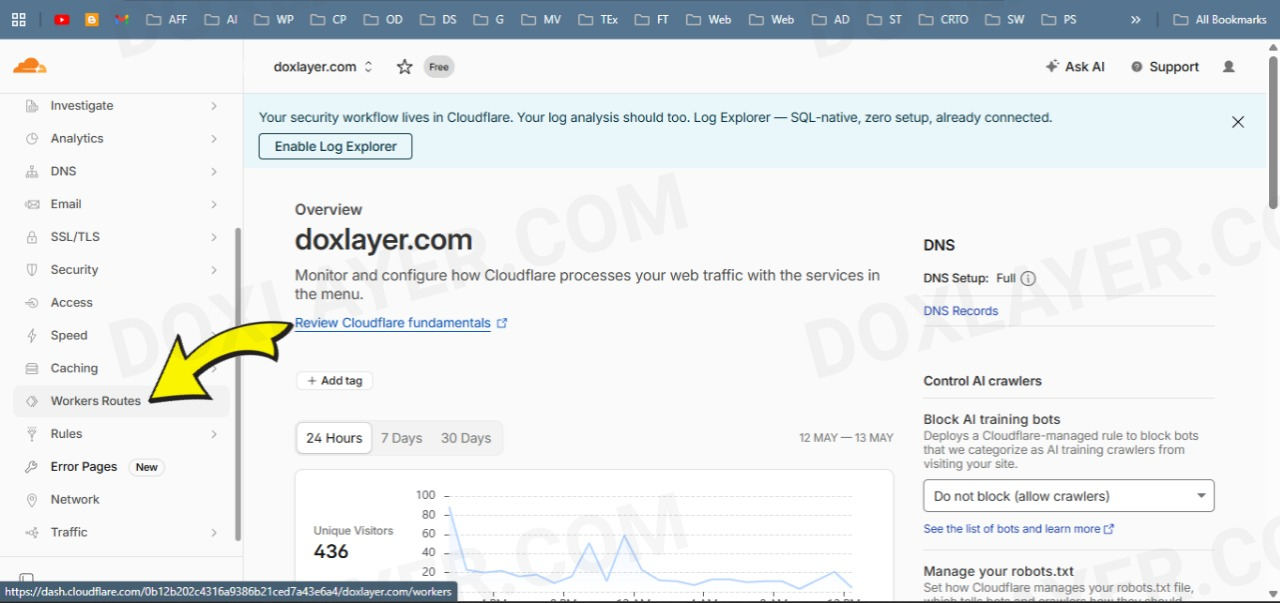
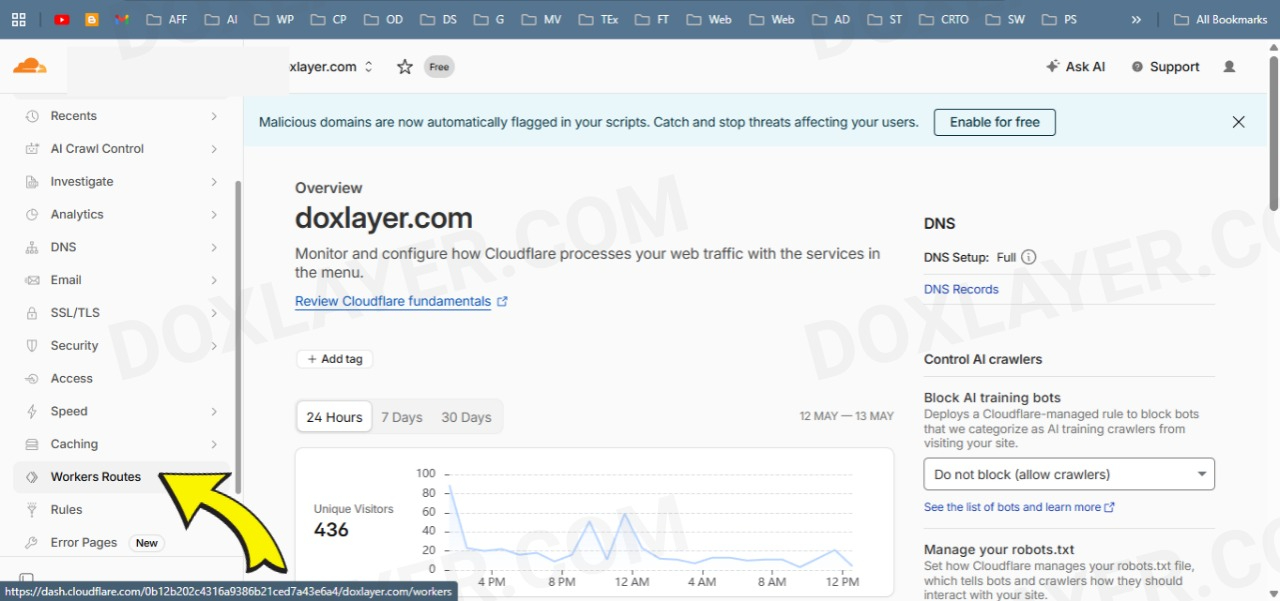
Log into your Cloudflare dashboard and navigate to the Workers routes section.

Click the button to manage your Cloudflare Workers.
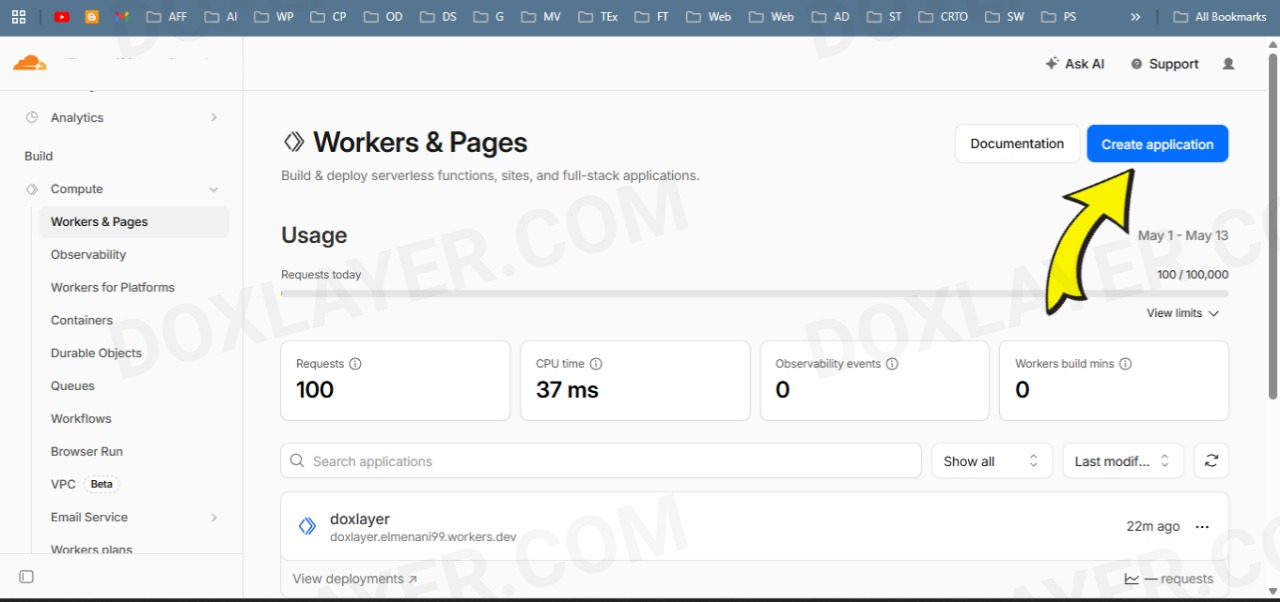
Click the button to create a new application.
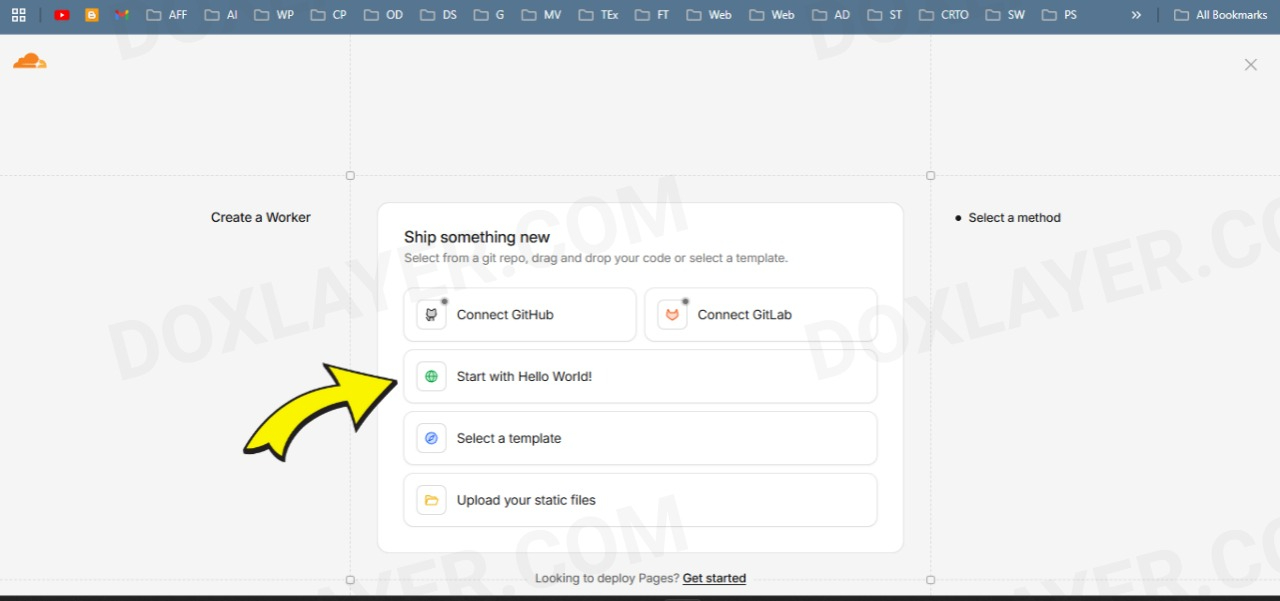
Choose the option to start with a basic "Hello world" template.
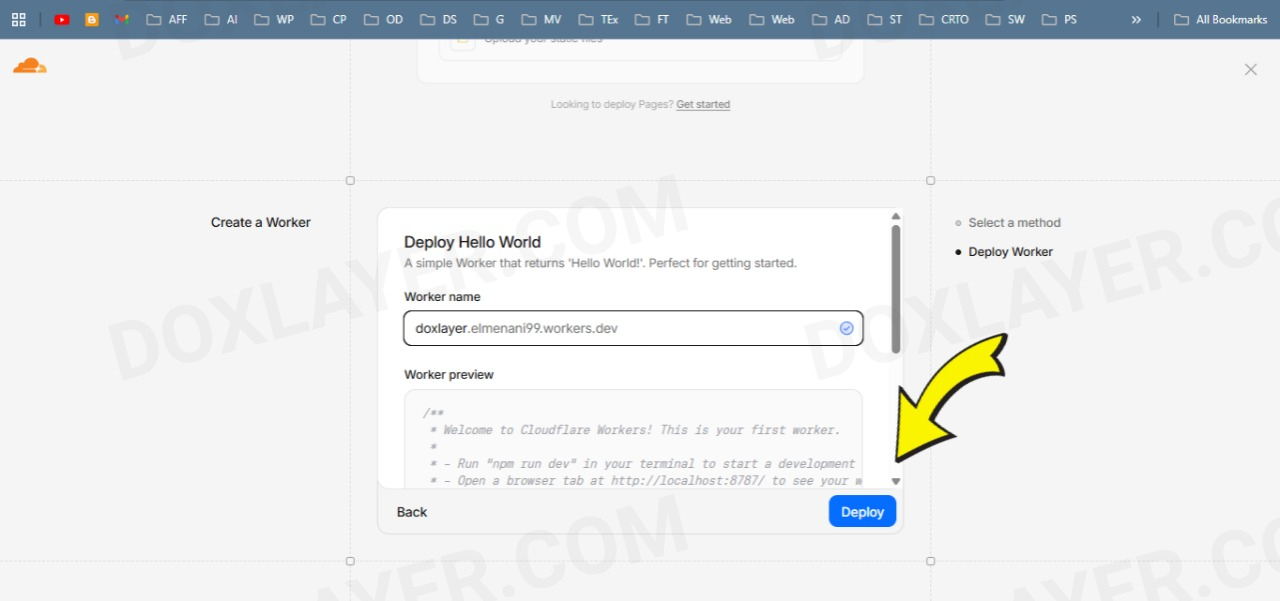
Give your Worker a recognizable name (e.g., blogger-seo-proxy) and click deploy.
Phase 2: Inject the Code
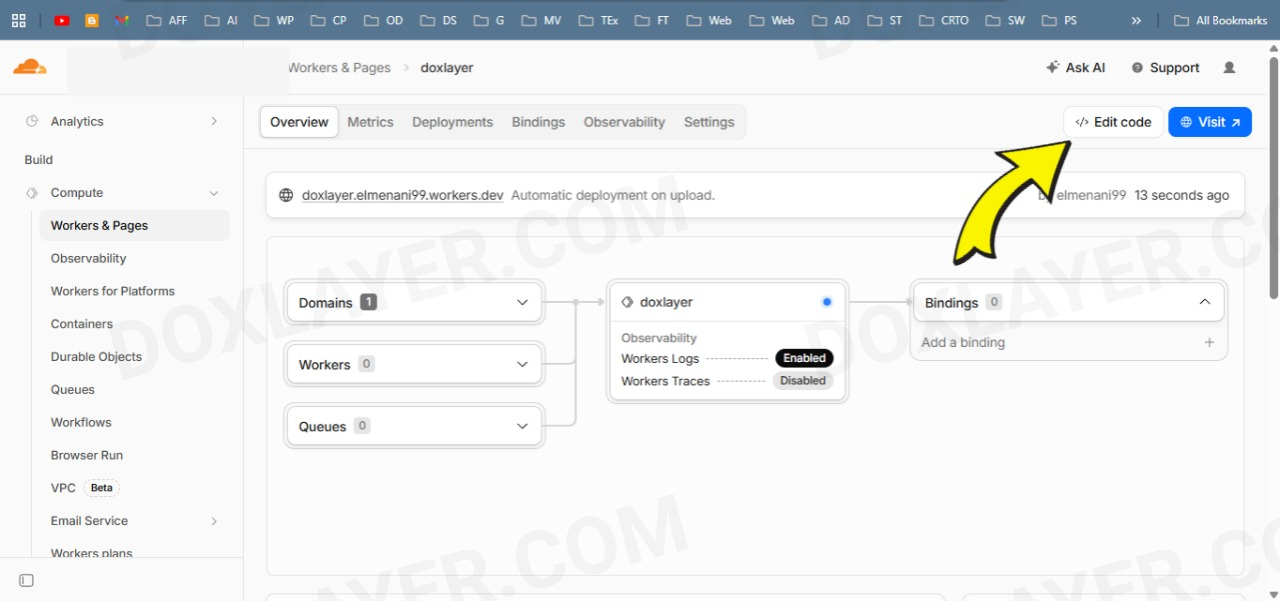
Once deployed, hit the "Edit code" button to open the Cloudflare code editor.
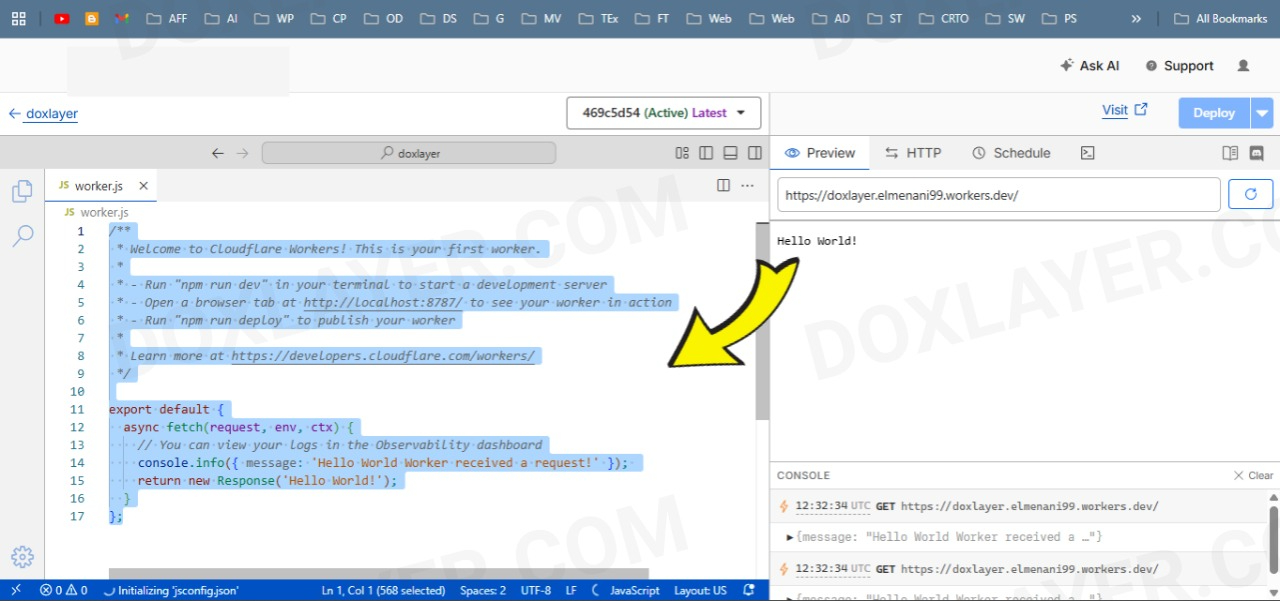
Clear out all the default "Hello World" code currently in the editor.
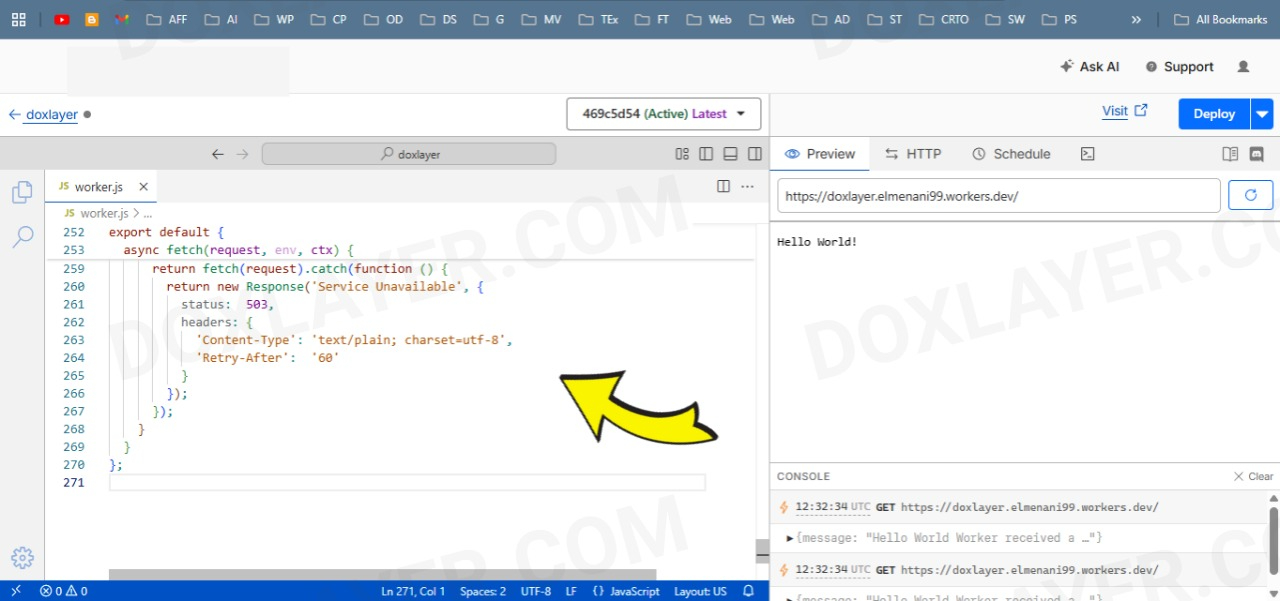
Paste the complete custom V5 Worker code into the editor, then click "Save and deploy".
/**
 * DOXLAYER CYBORG EDGE PROXY (V5)
 *
 * Request flow:
 *
 *   Client → GET /post.html
 *     ↓
 *   Worker detects mobile UA → silently adds ?m=1 to origin request
 *     ↓
 *   Blogger sees ?m=1 → serves 200 (no redirect)
 *     ↓
 *   Worker rewrites HTML → strips ?m=1 from all internal links
 *     ↓
 *   Client sees 200 on clean URL. No redirect. No ?m=1 anywhere.
 *
 * Direct ?m=1 requests → 301 to clean URL.
 * Edge cache → device-aware, aligned TTL, stale-while-revalidate.
 */

// ─── DETECTION PATTERNS ────────────────────────────────────────────────────────

// SEO crawlers + audit tools — served mobile content but must get 200 on clean URL
// Checked BEFORE mobile UA so bot intent is clear in logic
const BOT_UA = /googlebot|bingbot|yandexbot|duckduckbot|baiduspider|facebot|linkedinbot|pinterestbot|slackbot|twitterbot|whatsapp|telegrambot|applebot|crawler|spider|lighthouse|pagespeed|gtmetrix|pingdom|screaming.?frog|ahrefsbot|semrushbot|dotbot|rogerbot|mj12bot|petalbot|bytespider/i;

// Real mobile devices — Blogger would redirect these to ?m=1 without the worker
const MOBILE_UA = /android.+mobile|iphone|ipod|blackberry|iemobile|opera mini|opera mobi|palm|windows ce|series[46]0|symbian|treo|up\.browser|vodafone|wap|xiino|avantgo|bada|fennec|hiptop|kindle|lge |maemo|midp|mmp|netfront|palm|phone|pixi|plucker|psp|silk|danger|docomo|mot-|samsung|ucweb/i;

// Pass static assets directly to origin — no rewriting needed
const STATIC_RE = /\.(js|css|jpg|jpeg|png|gif|svg|webp|avif|ico|woff2?|ttf|eot|otf|pdf|zip|mp[34]|webm|ogg|xml|txt|csv|map|webmanifest)$/i;

// Blogger internal paths — bypass all logic
const BYPASS = ['/feeds/', '/b/', '/_/', '/gadgets/', '/rpc/', '/.well-known/'];

// ─── URL NORMALIZATION ─────────────────────────────────────────────────────────

// Strips m=1 from any URL string while preserving all other params and hash
function stripM(str) {
  if (!str || str.indexOf('m=1') === -1) return str;

  var hashIdx = str.indexOf('#');
  var hash    = hashIdx !== -1 ? str.substring(hashIdx) : '';
  var main    = hashIdx !== -1 ? str.substring(0, hashIdx) : str;

  var qIdx = main.indexOf('?');
  if (qIdx === -1) return str;

  var base  = main.substring(0, qIdx);
  var pairs = main.substring(qIdx + 1).split('&');
  var kept  = [];

  for (var i = 0; i < pairs.length; i++) {
    if (pairs[i] !== 'm=1' && pairs[i] !== 'm=') kept.push(pairs[i]);
  }

  var result = base;
  if (kept.length > 0) result += '?' + kept.join('&');
  if (hash) result += hash;
  return result;
}

// ─── HTML REWRITER HANDLERS ────────────────────────────────────────────────────

// Strips ?m=1 from href and action attributes on links and forms
class LinkCleaner {
  constructor(attr) { this.attr = attr; }
  element(el) {
    var val = el.getAttribute(this.attr);
    if (val && val.indexOf('m=1') !== -1) {
      el.setAttribute(this.attr, stripM(val));
    }
  }
}

// Strips ?m=1 from OG / Twitter / dox meta content attributes
// NOTE: canonical is a  not a  tag —
// it is handled by LinkCleaner('href') on link[href], not here
class MetaFixer {
  element(el) {
    var prop = (el.getAttribute('property') || el.getAttribute('name') || '').toLowerCase();
    if (
      prop.indexOf('og:')      === 0 ||
      prop.indexOf('dox:')     === 0 ||
      prop.indexOf('twitter:') === 0
    ) {
      var content = el.getAttribute('content');
      if (content && content.indexOf('m=1') !== -1) {
        el.setAttribute('content', stripM(content));
      }
    }
  }
}

// ─── MAIN HANDLER ──────────────────────────────────────────────────────────────

async function handle(request, ctx) {
  var url  = new URL(request.url);
  var ua   = request.headers.get('User-Agent') || '';
  var path = url.pathname;

  // ── Bypass: static assets and Blogger internals ──
  if (STATIC_RE.test(path)) return fetch(request);
  for (var b = 0; b < BYPASS.length; b++) {
    if (path.indexOf(BYPASS[b]) === 0) return fetch(request);
  }

  // ── Step 1: Redirect any incoming ?m=1 to clean URL ──
  // Covers old cached links, shared URLs, browser history.
  // 301 tells Google to permanently forget the ?m=1 version.
  if (url.searchParams.has('m')) {
    url.searchParams.delete('m');
    // Preserve all other query params (e.g. ?pg=2 for pagination)
    var cleanUrl = url.origin + url.pathname + (url.search || '');
    return Response.redirect(cleanUrl, 301);
  }

  // ── Step 2: Device classification ──
  // Bot is checked first — Googlebot Smartphone contains "mobile" in its UA
  // so checking bot first makes the intent explicit and avoids ambiguity
  var isBot    = BOT_UA.test(ua);
  var isMobile = MOBILE_UA.test(ua);
  var needM    = isBot || isMobile;

  // ── Step 3: Edge cache lookup ──
  // Cache key uses ?__d=1 for mobile/bot, ?__d=0 for desktop.
  // This gives device-aware caching without Vary: User-Agent,
  // which would fragment the cache across thousands of UA strings.
  var cache    = caches.default;
  var cacheKey = new Request(url.origin + url.pathname + url.search + (url.search ? '&' : '?') + '__d=' + (needM ? '1' : '0'));
  var hit      = await cache.match(cacheKey);

  if (hit) {
    var hitHeaders = new Headers(hit.headers);
    hitHeaders.set('X-Edge-Cache', 'HIT');
    return new Response(hit.body, { status: hit.status, headers: hitHeaders });
  }

  // ── Step 4: Build origin request ──
  // Silently append ?m=1 for mobile/bot so Blogger skips its own 302.
  // Desktop gets the clean URL — Blogger serves 200 for desktop UAs.
  var originUrl = new URL(url.toString());
  if (needM) originUrl.searchParams.set('m', '1');

  // ── Step 5: Fetch from Blogger origin ──
  // redirect:'manual' gives us full control over any redirects Blogger returns.
  var res = await fetch(originUrl.toString(), {
    method:   request.method,
    headers:  request.headers,
    redirect: 'manual'
  });

  // ── Step 6: Handle origin redirects (safety net) ──
  // If Blogger still redirects despite ?m=1 being present (edge cases),
  // follow it once manually. Strip ?m=1 from the target then re-add if needed.
  // After one hop, pass any further redirects through — prevents infinite loops.
  if (res.status >= 300 && res.status < 400) {
    var location = res.headers.get('Location');
    if (location) {
      var redirUrl = new URL(location, originUrl);
      redirUrl.searchParams.delete('m');
      if (needM) redirUrl.searchParams.set('m', '1');

      res = await fetch(redirUrl.toString(), {
        method:   request.method,
        headers:  request.headers,
        redirect: 'manual'
      });
    }
  }

  // ── Step 7: Pass through 304 Not Modified unchanged ──
  if (res.status === 304) {
    return new Response(null, { status: 304, headers: res.headers });
  }

  // ── Step 8: Transform HTML ──
  // Stream-rewrite all internal links, form actions, and meta content
  // to strip any ?m=1 Blogger may have injected into the served HTML.
  var ct     = res.headers.get('Content-Type') || '';
  var isHTML = ct.indexOf('text/html') !== -1;
  var output;

  if (isHTML) {
    var rewriter = new HTMLRewriter()
      .on('a[href]',      new LinkCleaner('href'))    // internal page links
      .on('link[href]',   new LinkCleaner('href'))    // canonical + RSS links
      .on('form[action]', new LinkCleaner('action'))  // search forms
      .on('meta',         new MetaFixer());            // OG / Twitter / dox metas

    output = rewriter.transform(res);
  } else {
    output = res;
  }

  // ── Step 9: Build final response headers ──
  var headers = new Headers(output.headers);

  // Security headers
  headers.set('Strict-Transport-Security', 'max-age=31536000; includeSubDomains; preload');
  headers.set('X-Content-Type-Options', 'nosniff');
  headers.set('X-Frame-Options', 'SAMEORIGIN');
  headers.set('Referrer-Policy', 'strict-origin-when-cross-origin');
  headers.set('Permissions-Policy', 'geolocation=(), microphone=(), camera=()');

  // Cache headers — aligned TTL between browser and CDN edge.
  // Both set to 30min so a newly published post appears within 30min everywhere.
  // stale-while-revalidate allows serving stale while revalidating in background.
  if (isHTML && res.status === 200) {
    headers.set('Cache-Control',     'public, max-age=1800, stale-while-revalidate=86400');
    headers.set('CDN-Cache-Control', 'public, max-age=1800, stale-while-revalidate=86400');
  }

  // Strip Vary: User-Agent — device separation is handled via cache key, not Vary.
  // Keeping Vary: User-Agent would fragment the cache for every UA string.
  var vary = headers.get('Vary');
  if (vary) {
    var parts = vary.split(',');
    var kept  = [];
    for (var v = 0; v < parts.length; v++) {
      if (parts[v].trim().toLowerCase() !== 'user-agent') kept.push(parts[v].trim());
    }
    if (kept.length === 0) headers.delete('Vary');
    else headers.set('Vary', kept.join(', '));
  }

  // Remove Blogger internal noise headers
  headers.delete('X-Blogger-Server');
  headers.delete('X-Blogger-Data');

  // Debug headers — shows cache and device state, safe to expose
  headers.set('X-Edge-Cache',  'MISS');
  headers.set('X-Edge-Device', needM ? 'mobile' : 'desktop');

  var finalRes = new Response(output.body, {
    status:     res.status,
    statusText: res.statusText,
    headers:    headers
  });

  // ── Step 10: Write to edge cache asynchronously ──
  // ctx.waitUntil keeps the Worker alive until the write completes
  // without blocking or delaying the response already sent to the client.
  if (isHTML && res.status === 200) {
    ctx.waitUntil(cache.put(cacheKey, finalRes.clone()));
  }

  return finalRes;
}

// ─── EXPORT ────────────────────────────────────────────────────────────────────

export default {
  async fetch(request, env, ctx) {
    try {
      return await handle(request, ctx);
    } catch (err) {
      // Ultimate fallback — bypass all worker logic and hit origin directly.
      // If origin also fails, return a clean 503 with Retry-After.
      return fetch(request).catch(function () {
        return new Response('Service Unavailable', {
          status:  503,
          headers: {
            'Content-Type': 'text/plain; charset=utf-8',
            'Retry-After':  '60'
          }
        });
      });
    }
  }
};
Phase 3: Route Your Traffic
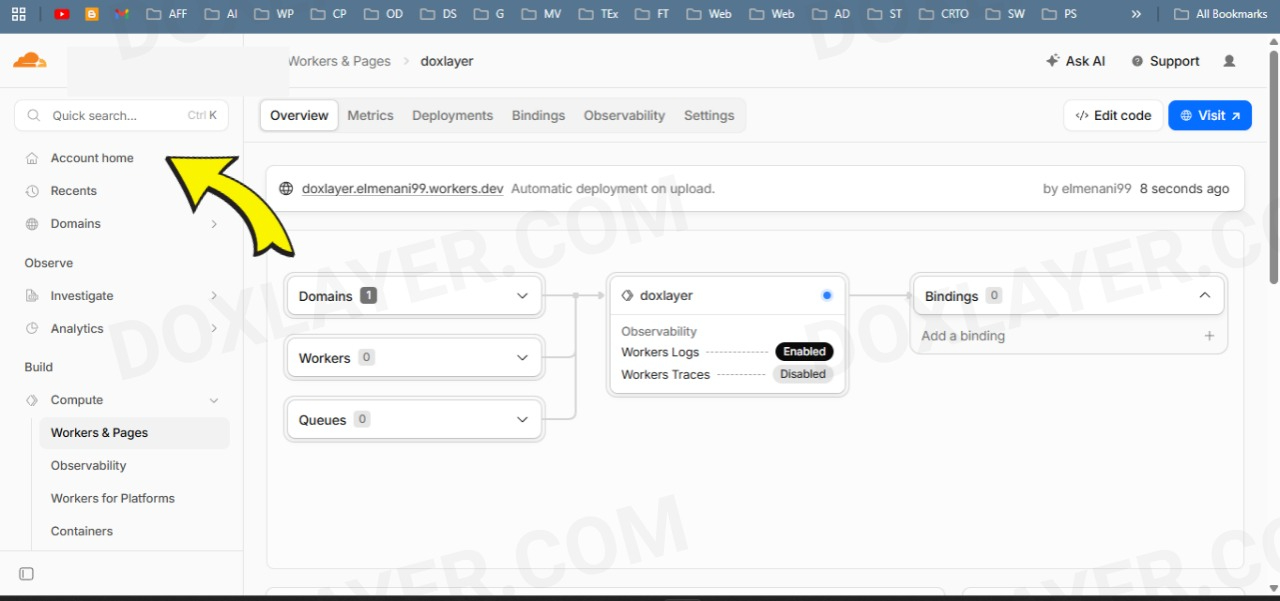
Exit the editor, go back to your Cloudflare Account Home, and click on your active domain name.
In your domain's sidebar, hit the "Workers Routes" tab again.
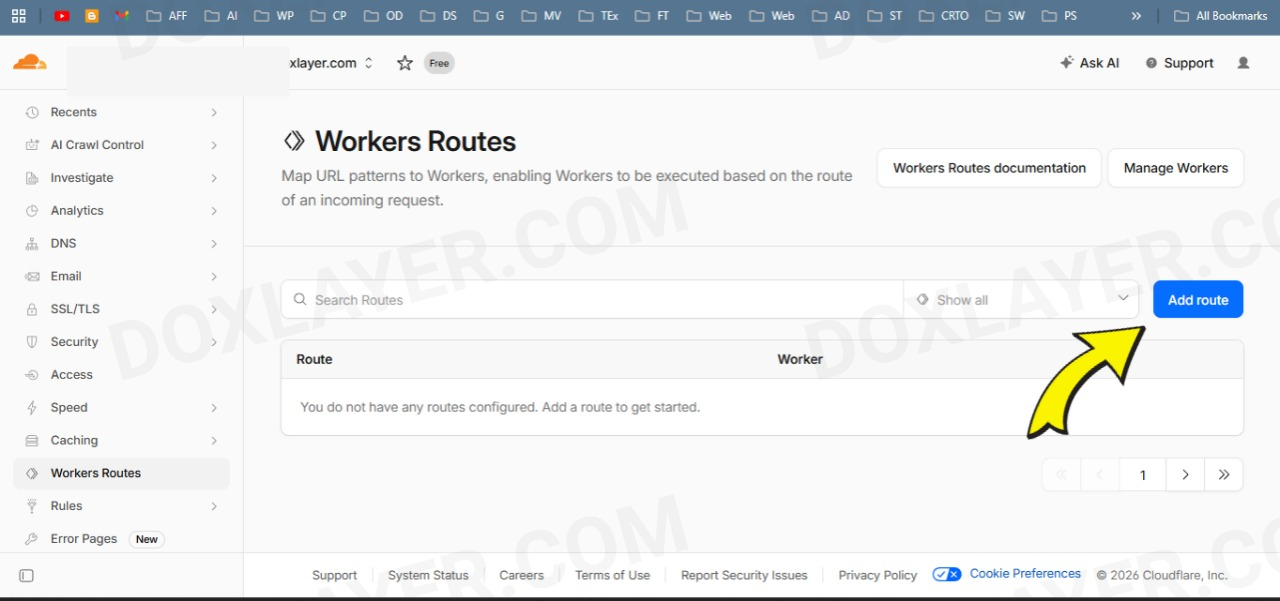
Click the button to add a new route.
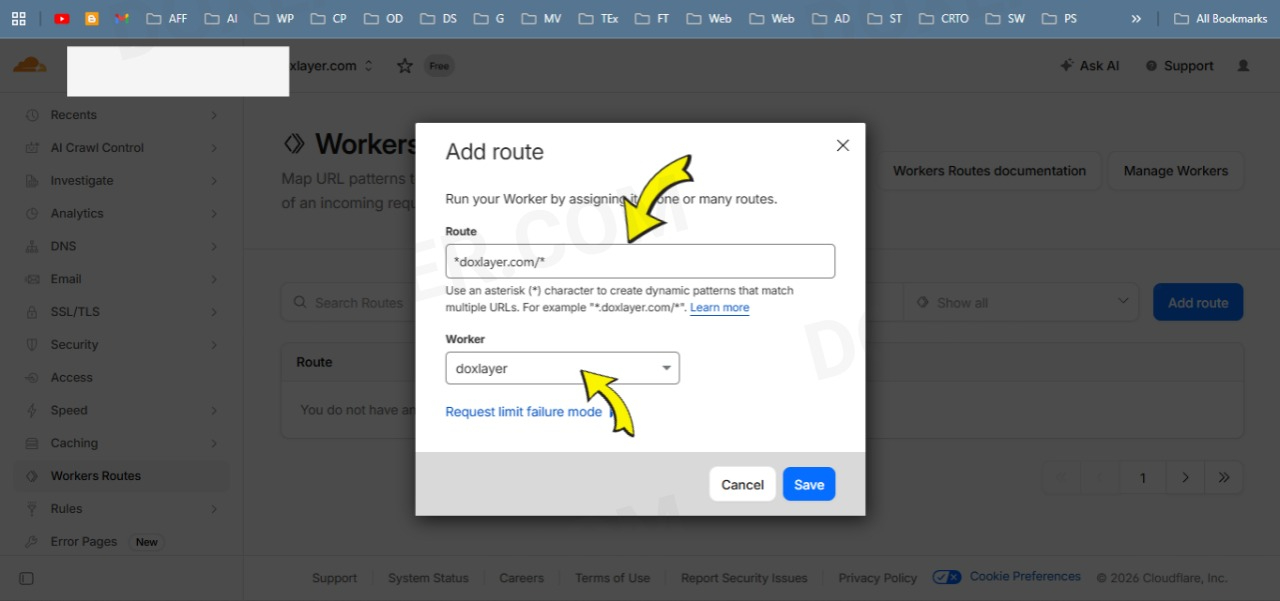
In the Route field, type *yoursite.com/* (or your domain). Select the Worker you just created from the dropdown, and hit Save.
What to Expect in the First 48 Hours
Once your route is live, the change is immediate for new visitors. But Google doesn't re-crawl everything instantly. Here's the realistic timeline I observed on my own sites:
Minutes 0–30: The Worker is active. You can test it yourself by visiting a clean URL with your browser's mobile user-agent spoofed, or simply by checking that your site still loads normally. If you see a 500 error, check your route pattern — a typo in the domain name is the most common mistake.
Hours 1–24: Nothing visible in Search Console yet. This is normal. Google has to discover that the redirects are gone during its next scheduled crawl. Don't panic if the error count doesn't drop immediately.
Days 2–7: You should start seeing the "Redirect Error" count decrease. Use the URL Inspection Tool in GSC to test individual URLs. If the live test shows a green checkmark and "URL is available to Google," you're on the right track. Click Request Indexing for your most important pages to speed up the process.
Weeks 2–4: For larger sites with hundreds of posts, full recovery takes time. Google has a crawl budget for each site, and it won't recrawl everything on day one. Be patient. I saw my indexing rate recover fully within three weeks for a site with roughly 150 posts.
If Google Still Shows Errors After Deploying
This Worker handles the vast majority of Blogger configurations, but there are a few edge cases that can trip things up. Here is what to check if you still see redirect errors after setup:
Rocket Loader is turned on: Cloudflare's Rocket Loader can interfere with HTML streaming and rewriting. Go to Speed → Optimization in your Cloudflare dashboard and make sure Rocket Loader is disabled. This is the single most common post-deployment issue.
Cached redirects in your browser: Your browser might be holding onto old 302 redirects. Test in an incognito window or use curl from a terminal to bypass browser cache entirely.
Third-party scripts injecting links: Some Blogger widgets or third-party comment systems append ?m=1 dynamically via JavaScript after the page loads. The Worker can't catch those because it only processes the initial HTML response. If you suspect this, temporarily disable widgets and retest.
Custom domain not fully routed: If you use Blogger's default .blogspot.com URL instead of a custom domain, Cloudflare Workers won't work because you don't control the DNS. This solution requires a custom domain with Cloudflare as your nameserver.
Why This Approach Beats Every Alternative
I chose the Cloudflare Worker path after trying everything else because it is the only solution that fixes the problem at the network edge without altering your Blogger template or content. You don't touch a single line of Blogger HTML. You don't install plugins. You don't sacrifice mobile usability. And if you ever want to stop using it, you delete the route and your site returns to exactly how it was before.
The free tier gives you 100,000 requests per day, which is more than enough for most independent blogs. Even if you outgrow it, the paid plan is inexpensive compared to the traffic loss from having half your site unindexed.
Final Checklist
Before you call this done, run through these steps:
• Ensure Rocket Loader is OFF in Cloudflare.
• Purge your Cloudflare cache from the Caching dashboard.
• Run a Live Test in Google Search Console on a previously failing URL.
• Request indexing for your top 10 most important posts.
• Check back in 48 hours to confirm error counts are dropping.
Fixing the ?m=1 redirect issue is one of the highest-impact, lowest-effort improvements you can make to a Blogger site's search performance. It doesn't require a server migration, a template redesign, or a budget. It just requires understanding the actual problem — which, as it turns out, has nothing to do with your content and everything to do with how Blogger talks to Google's crawler.
If you deploy this and still hit edge cases I didn't cover, the comments on this post are open. I maintain this script actively and update it as Blogger's behavior changes. Good luck getting your index back.